
How to Install and Activate an eSIM on Nokia Phones (Step-by-Step Guide)
Aug 05,2026 | Milo
Your flight is calling, you’ve got a digital SIM code in your inbox, and you need it working by the time you touch down. Let’s skip the technical explanations of how digital cellular tech actually operates. Nokia runs on a very clean, bloat-free version of Android, which makes configuring this stuff completely painless. Give it three minutes, and you’ll be set.
Does Your Nokia Phone Support eSIM?
Before you spend half an hour digging through your settings menu and getting frustrated, let's make sure your phone actually has the hardware built into it. Not every Nokia supports digital SIMs.
If you are holding a Nokia X30 5G, Nokia G60 5G, or a Nokia XR21, you are good to go.
Don't see your phone on that list? Here is the ultimate, foolproof hardware check that takes five seconds:
Open your phone's dialer (where you make calls) and type in *#06#. A screen with barcodes and long numbers will pop up. Look closely. If you see a 32-digit number labeled EID, congratulations. Your phone supports eSIM. If you don't see an EID number, stop reading. You need to buy a traditional physical plastic SIM card.
The App Method (The Easiest Route)
If you want the path of absolute least resistance, use the official ByteSIM app. Honestly, this is the best way to handle things while you are still sitting on your couch, long before heading to the airport. Just grab the app from the Google Play or APP Store and log in with whatever email you used to buy the data plan.
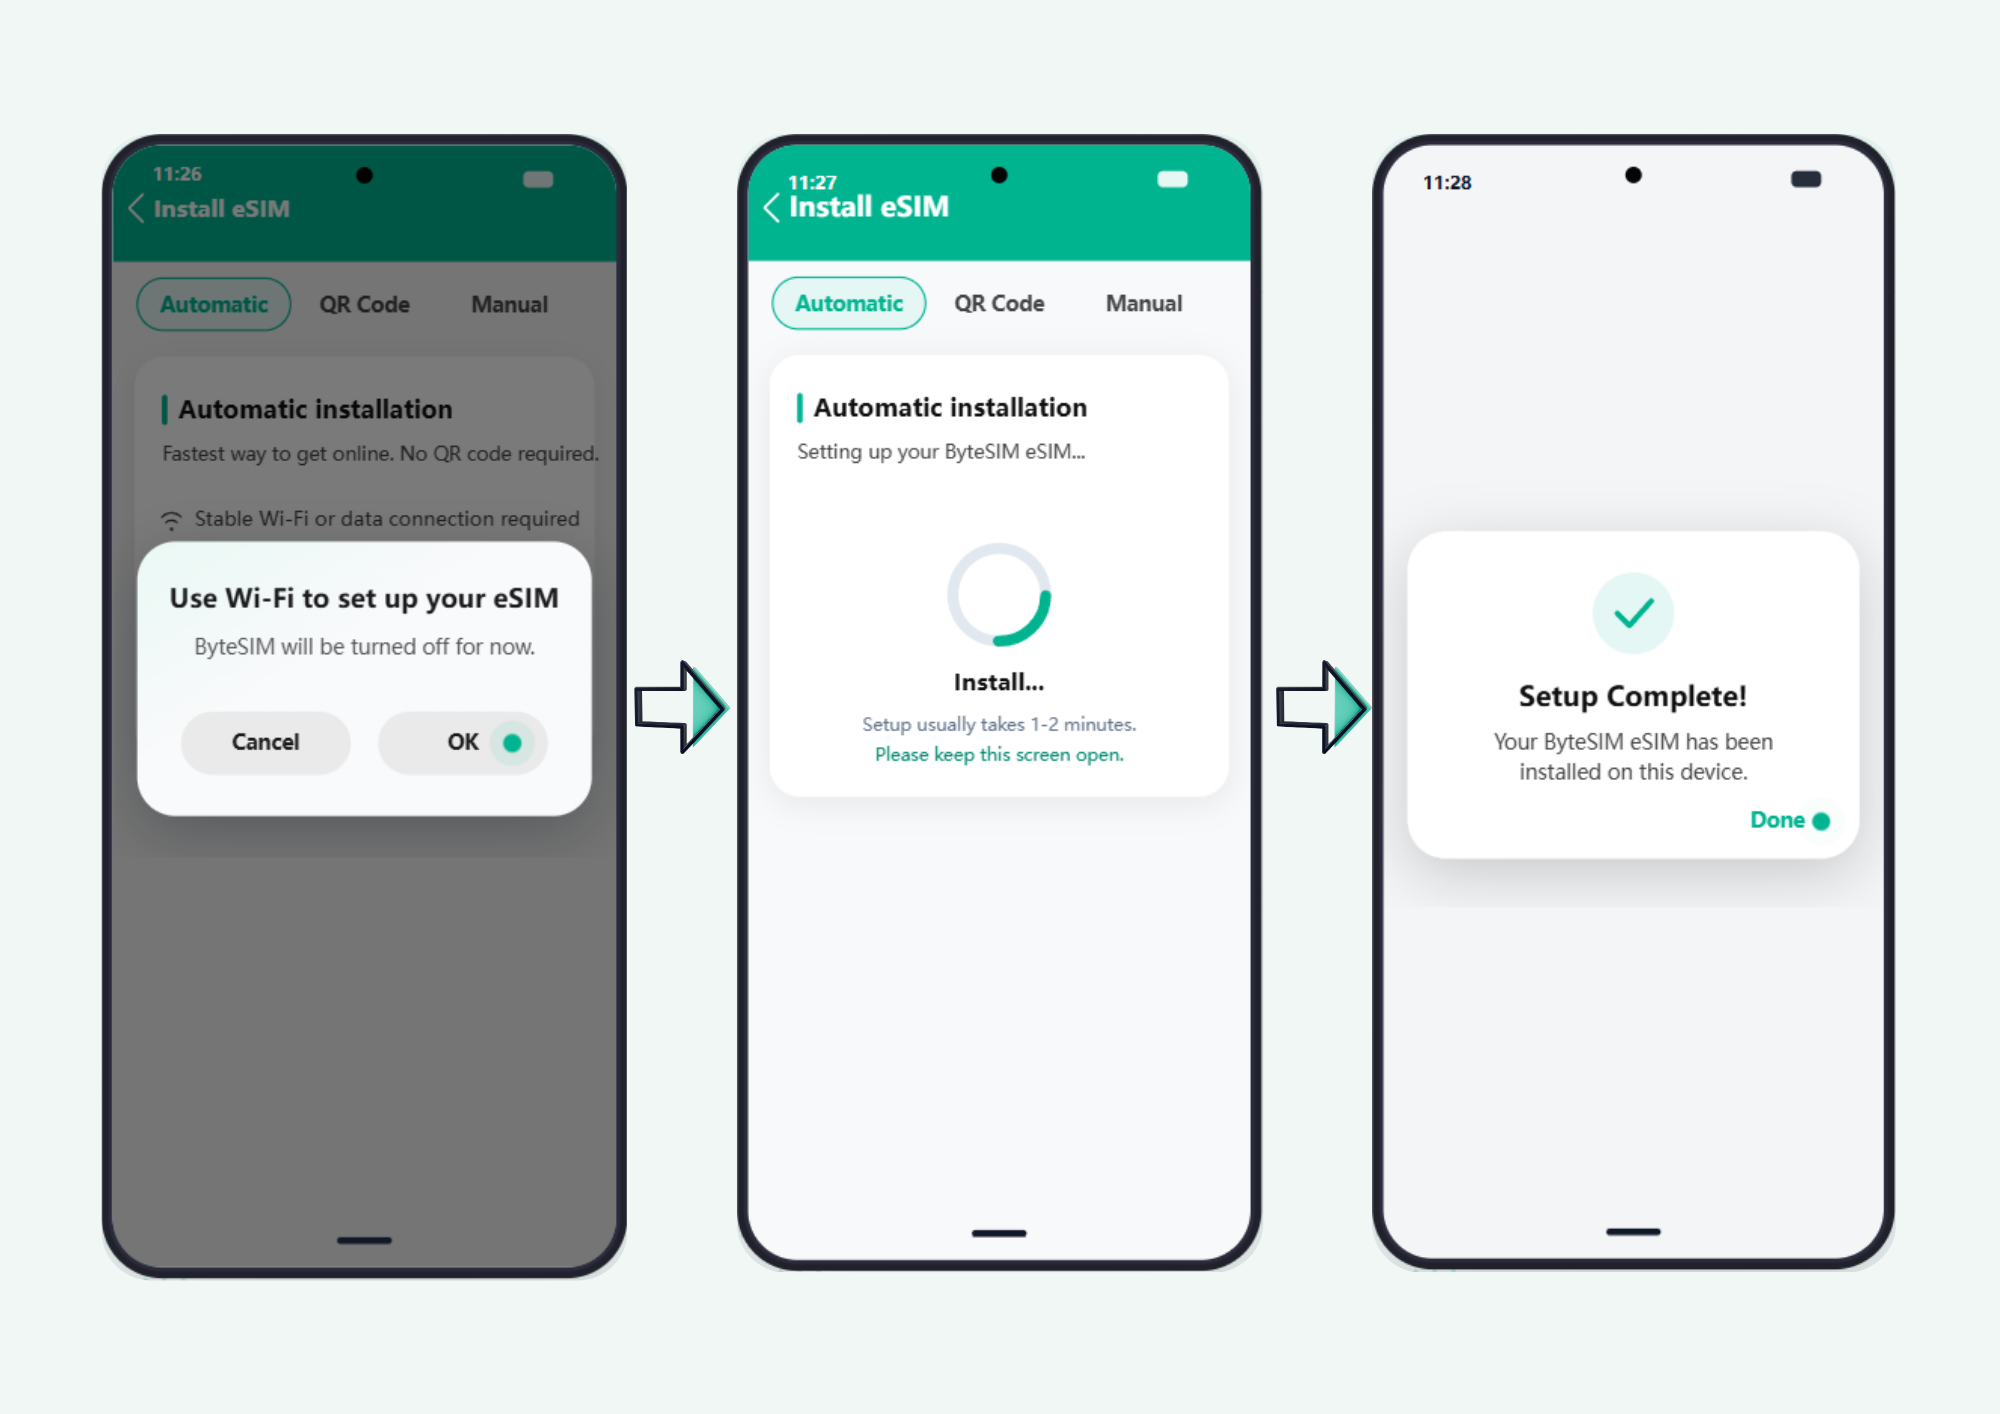
Once you’re in, head over to the "My eSIMs" tab. Find your upcoming trip's profile and hit the "Install" button. Your Nokia might pop up a quick system prompt asking for permission to use Wi-Fi networks—just tap OK to let it do its thing. Android will take over from there. Give the phone a minute or two to silently configure everything in the background. Once the success message pops up, just tap Done. You are fully loaded and ready for takeoff.
The QR Code Method (No Extra Apps Needed)
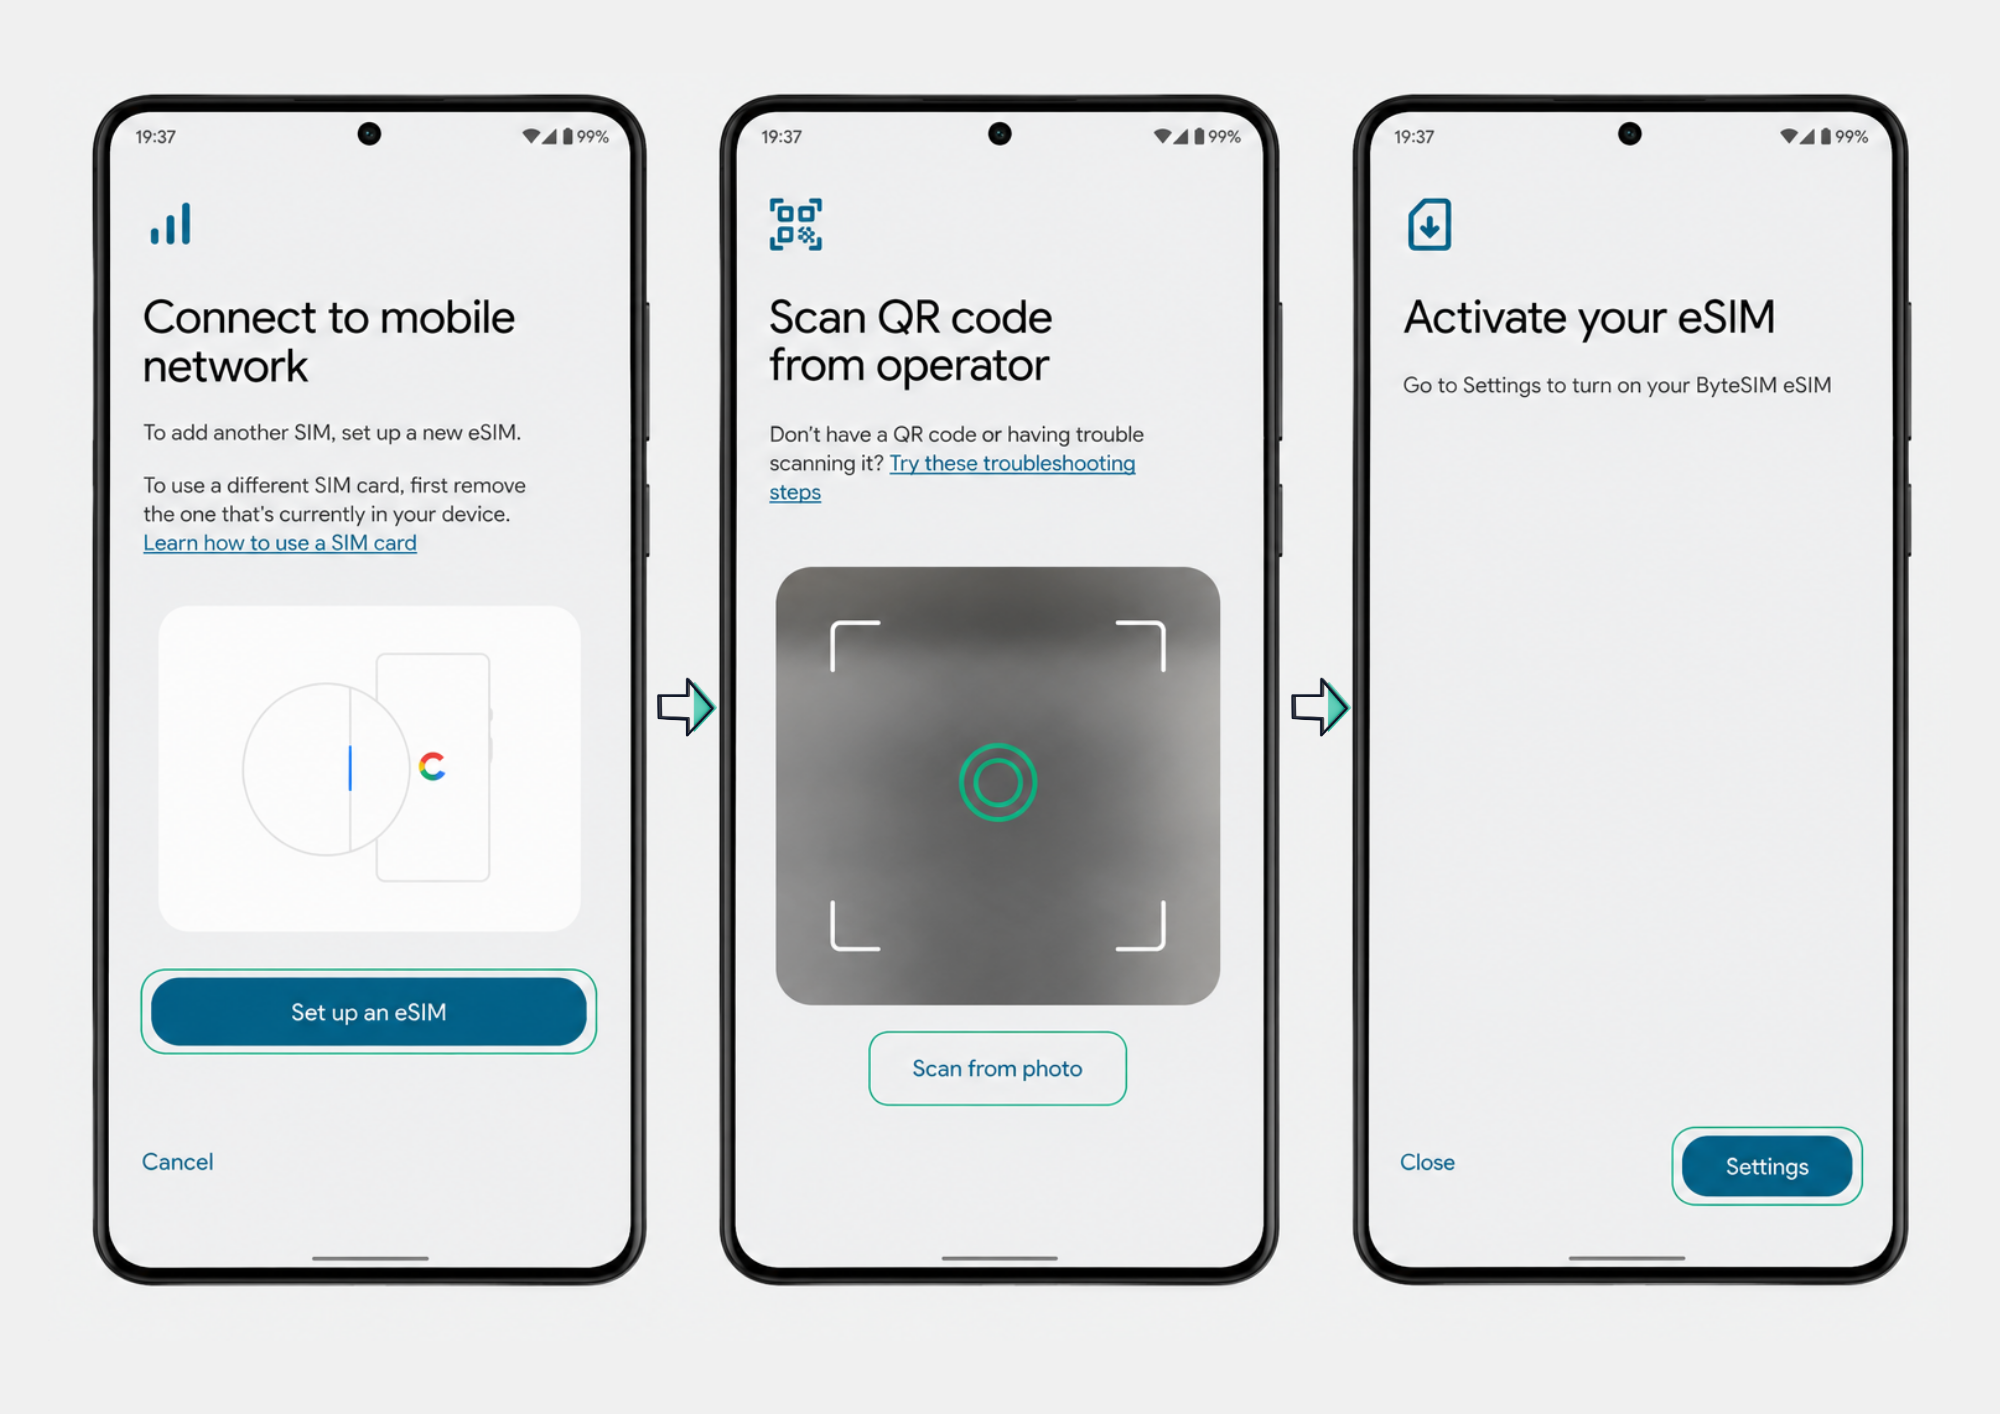
If you’d rather not clutter your app drawer with another travel app, you can handle the entire process directly through Android’s native menus. Dive into Settings > Network & Internet > Mobile Network. Scroll until you see "Download SIM" and choose the option to set up a new eSIM.
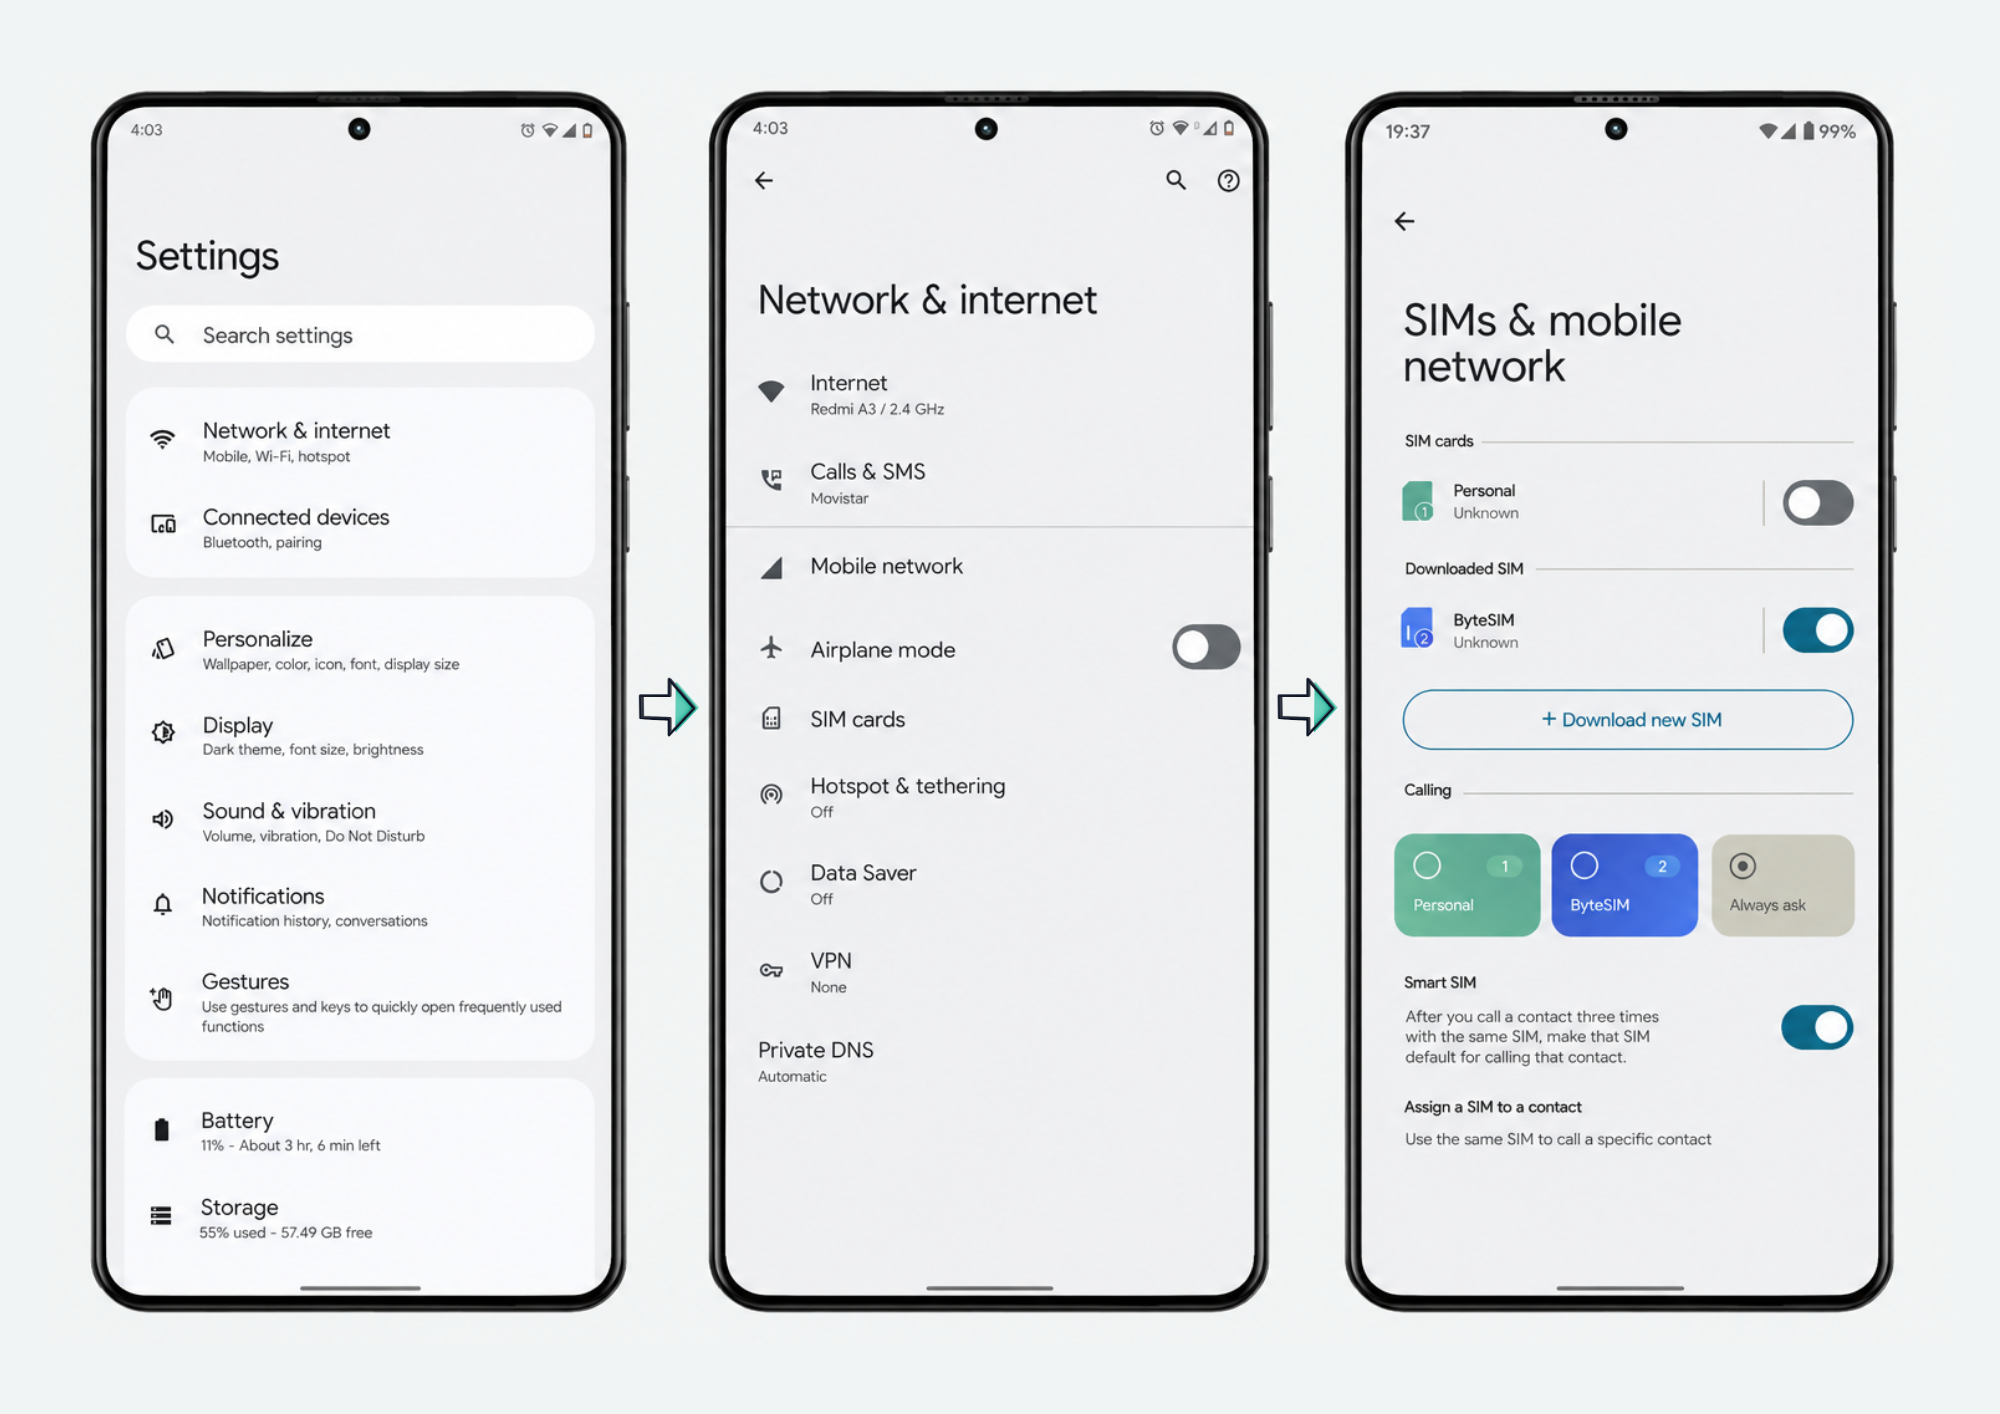
At this point, your camera scanner will open. If you travel with an iPad, a laptop, or a friend, pull the QR code up on that second screen and point your Nokia at it. Flying solo without a laptop? No problem. Before you start, save the QR code image from your email directly to your phone's camera roll. When the scanner opens, simply tap the "Scan from photo" option, select that saved image from your gallery, and the phone will instantly read it. Hit "Set up" to authorize the addition, let the progress bar finish, and then tap Settings to move on to activation.
The Manual Entry Method (The Failsafe)
Sometimes technology just refuses to cooperate. If your camera won't focus, the screen is cracked, or the gallery import is glitching out, you can force the installation by feeding the network coordinates to your phone manually.
Navigate to the exact same scanner screen as the QR method (Settings > Network & Internet > Mobile Network > Download SIM). Instead of trying to scan anything, look right below the camera viewfinder. You should see a text link that says "Try these troubleshooting steps." Tap that, then select "Enter activation code."
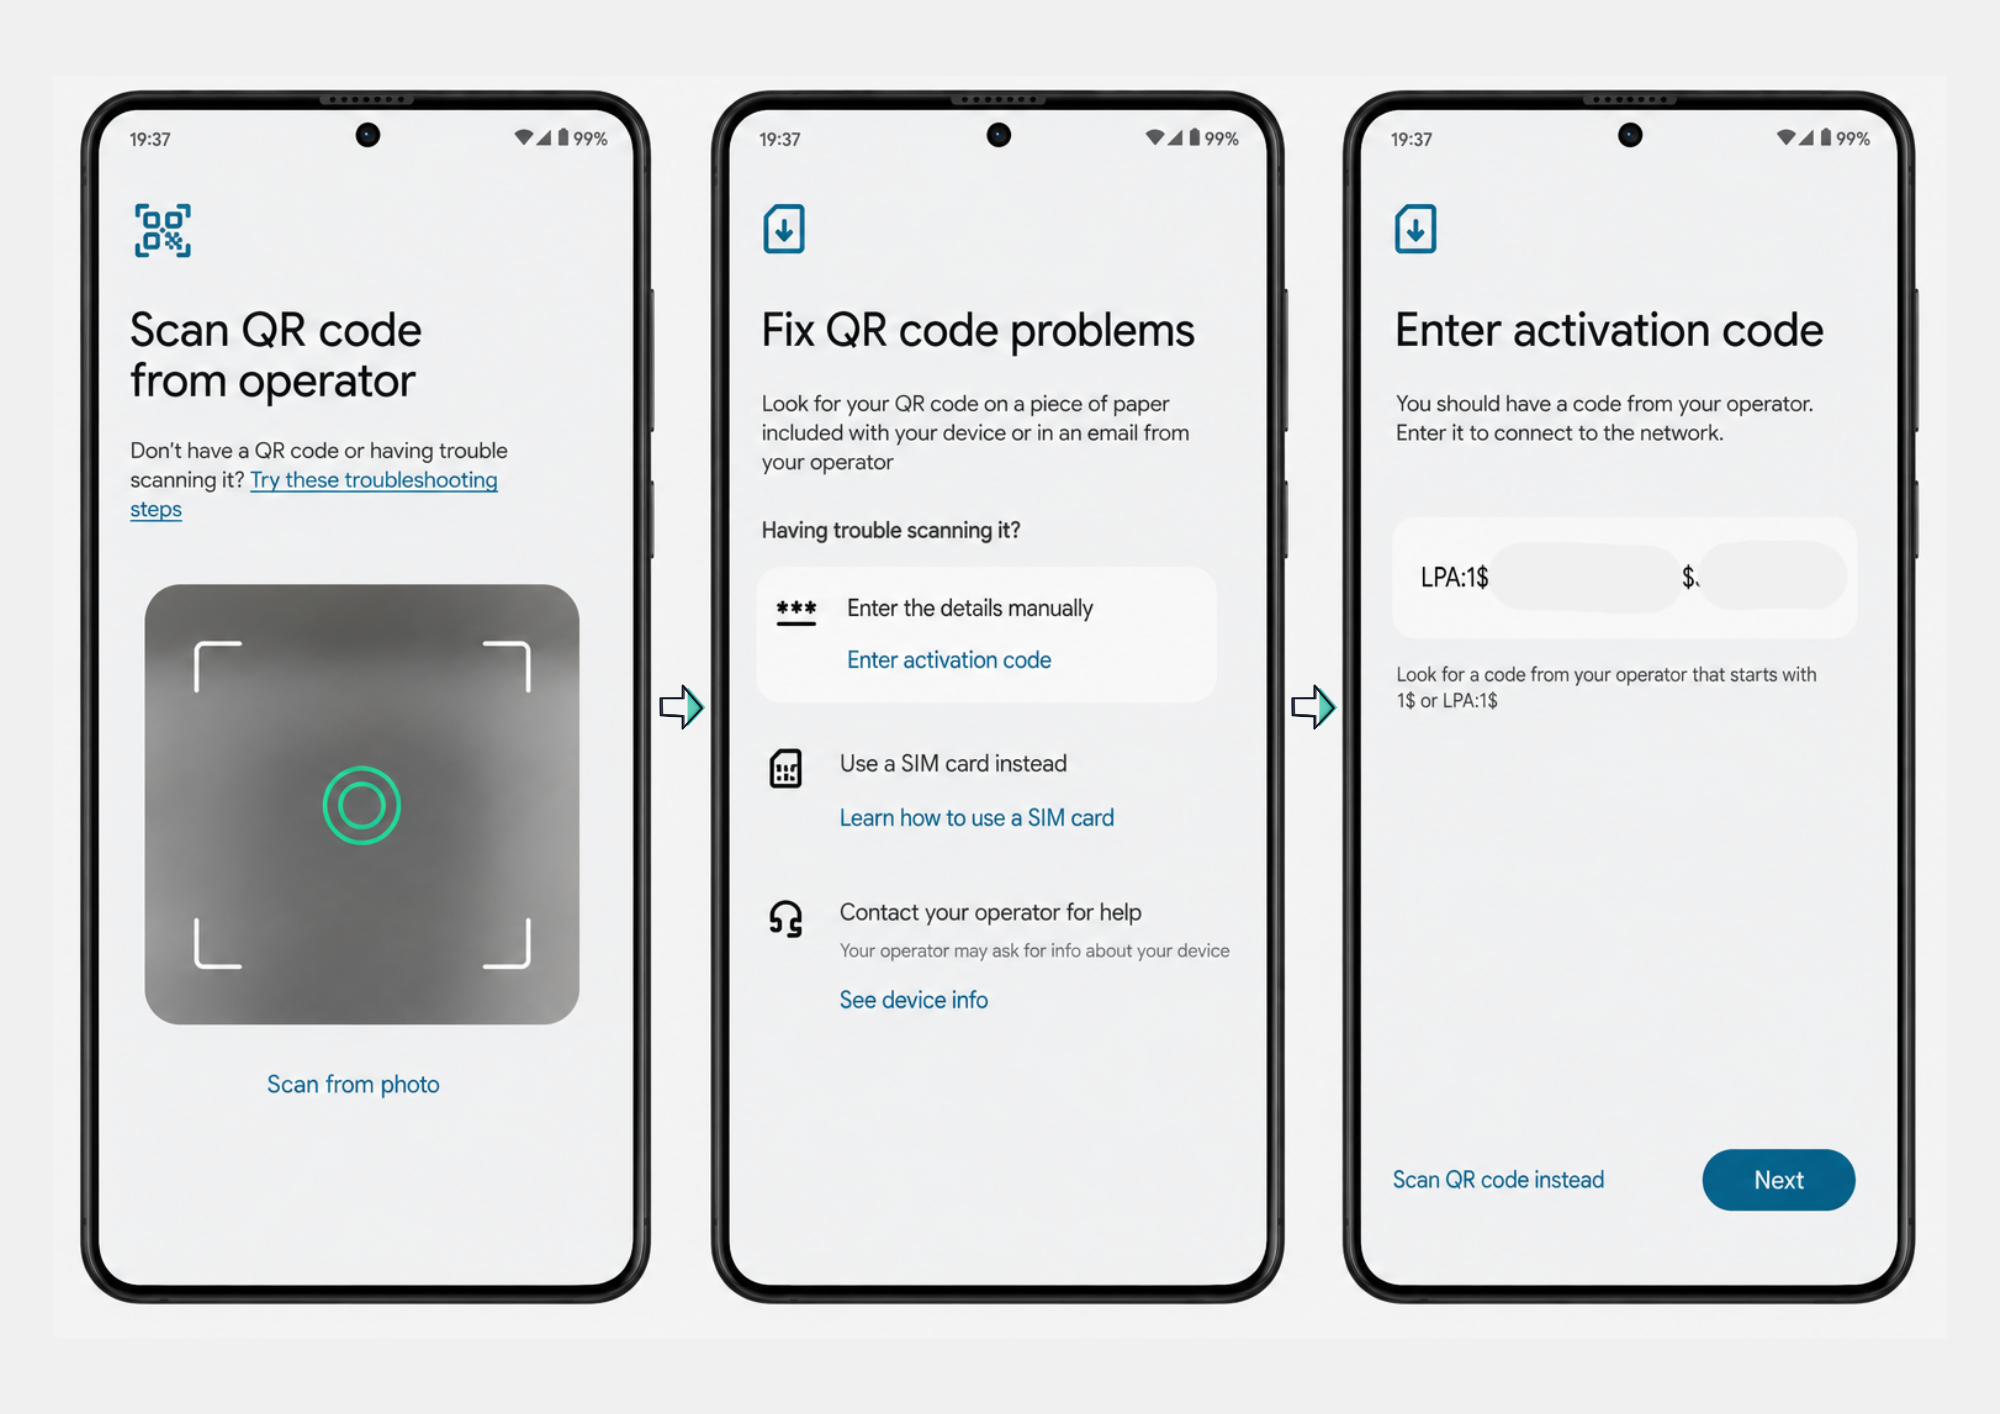
Now, jump back to your confirmation email. You are looking for a massive, complicated block of text usually labeled as the LPA address. Do not try to type this out by hand—you will almost certainly miss a random letter or punctuation mark. Copy that entire string of text, paste it directly into the empty activation box, and hit Next. Once the system recognizes the manual code, hit "Set up," and the profile will successfully lock onto your device.
How to activate an eSIM on Nokia
When your eSIM has been installed, you'll need to enable it before you can connect to the network. For travel eSIMs like ByteSIM, it's best to keep the new line disabled while you're still sitting at your home airport. Wait until you get off the plane.
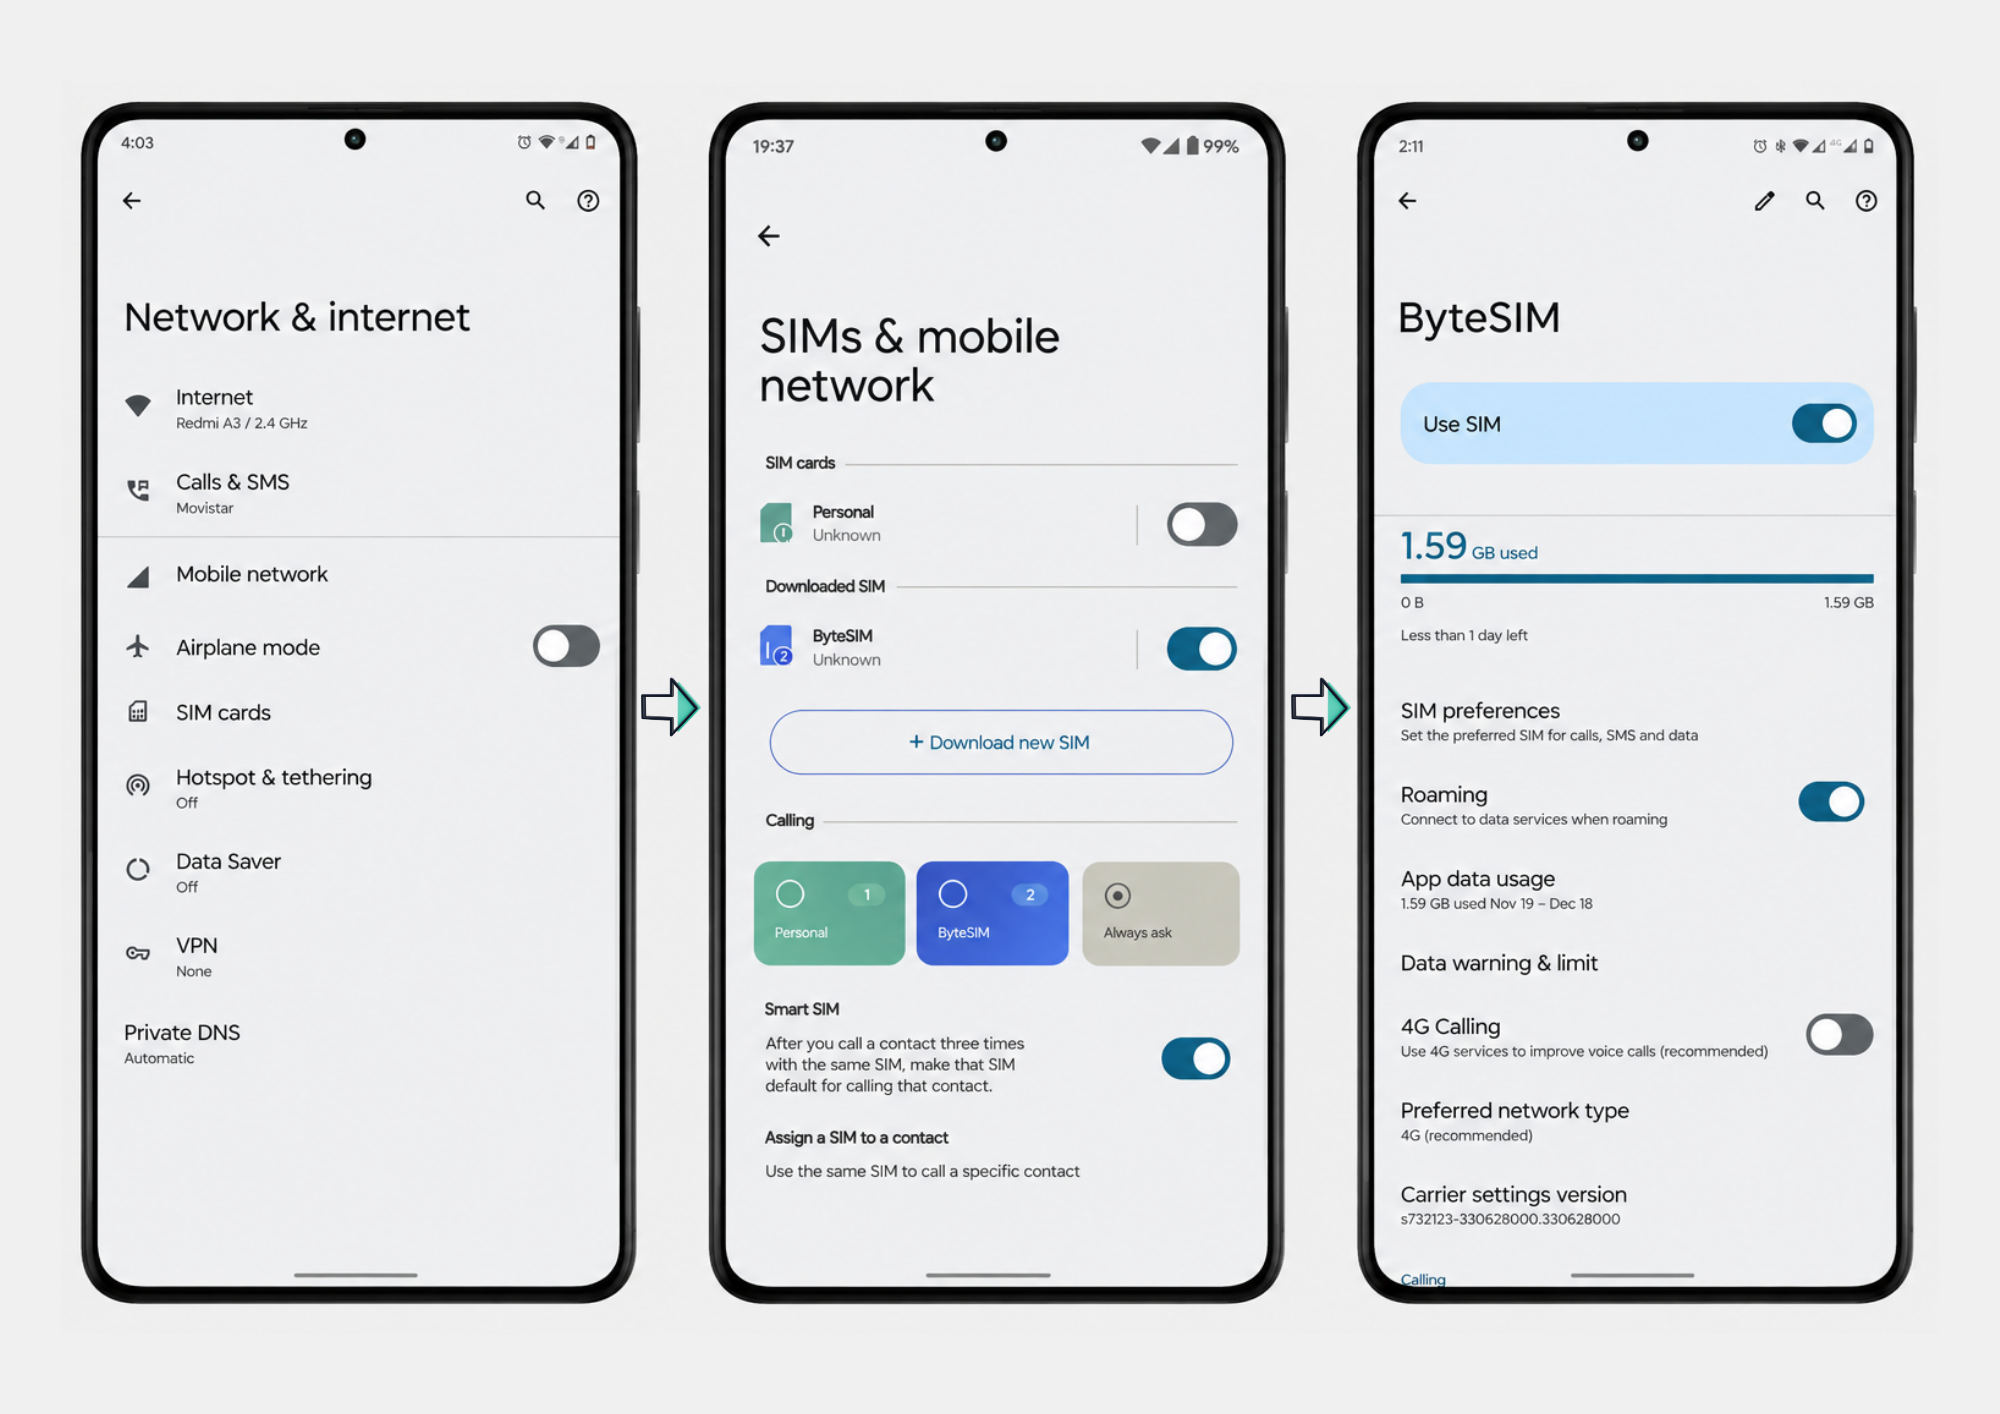
Once you arrive, head back into Settings > Network & Internet > Mobile Network. We highly recommend switching your primary domestic SIM off so you don't get hit with unexpected roaming fees. Tap the newly added ByteSIM profile, toggle "Use SIM" to the ON position, and verify that "Data Roaming" is also active.
Common Nokia eSIM Problems and Fixes
If everyone else is booking their Ubers while you're staring at a dead screen, try these rapid fixes before panicking:
-
Camera won't read the code? Make sure the monitor displaying your QR code is cranked to maximum brightness. Phone lenses hate dim screens. Also, remember you can't use a phone's camera to scan an image displayed on its own screen.
-
Frozen on the "Activating" screen? Spotty airport Wi-Fi is usually the culprit. If the download gets interrupted, it hangs. Do not hit delete. Just reboot your Nokia entirely to force it onto a cleaner connection.
-
Seeing a "No Service" warning? If you haven't left your home country yet, this is totally normal—these plans are geographically locked and remain dormant until you reach your destination. If you're already abroad, your internal antenna might just be asleep. Toggle Airplane Mode on for ten seconds, then off. That forces the device to hunt for local cell towers.
-
Full bars, but nothing is loading? You likely missed a setting. Double-check that this specific eSIM is assigned to handle your data, and that data roaming is allowed. Still failing? Check the setup email for an APN (Access Point Name). Sometimes you have to manually open your APN settings and type in a single word—like internet—to open the gates.
-
A warning about deleting: Consider your QR code a self-destructing message. The moment it successfully pairs with your motherboard, the code expires. If you get frustrated and tap "Delete Profile," you cannot simply rescan the original email. The line is gone, and you'll have to contact customer service for a replacement. Never trash your profile until the trip is completely over.
Where to next?
Lock in your destination
Grab your data plan now, get it onto your Nokia before boarding, and skip the scramble for airport Wi-Fi when you touch down.






Instant delivery • Easy setup • 24/7 support
Comment