
Every day, we receive questions like these through our Help Center: "I've already arrived at my destination, so why do I still have no signal?" "My eSIM was installed successfully, but why can't I access the internet?"
If you're experiencing the same problem, don't worry. In most cases, the issue isn't with your eSIM itself. Based on years of customer support experience, the majority of connection problems happen because one or more activation steps were missed after installation.
In this guide, we'll walk you through the correct activation process step by step. Follow the checklist below after arriving at your destination, and in most cases, you'll be able to get your travel eSIM connected within just a few minutes.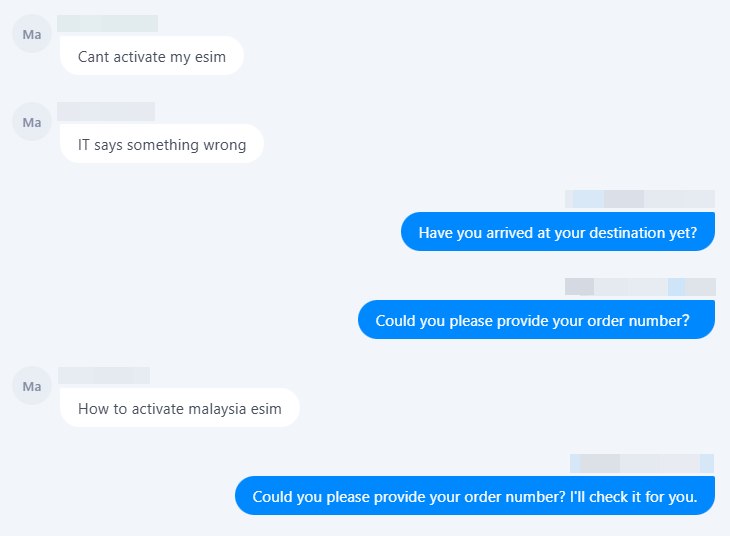
What Problem Are You Experiencing?
Situation 1: I Haven't Arrived at My Destination Yet
- My eSIM shows "Activating."
- My phone displays "No Service."
- I can't connect to the network.
Situation 2: I've Already Arrived at My Destination
- No Signal
- Signal available, but no internet
- Still Can't connect to the network
Why Your eSIM Isn't Connecting
Situation 1: If You Haven't Arrived Yet
If you haven't reached your destination yet, it's completely normal that your travel eSIM isn't connected to a mobile network.
Most travel eSIMs only activate after they connect to a supported local network in the destination country or region. Before you arrive, your eSIM may show statuses such as "Activating," "No Service," or "Searching," which doesn't necessarily indicate a problem.
There's no need to troubleshoot at this stage. Instead, we recommend reading the activation checklist below before your trip so you can get connected more quickly after arrival.
Situation 2: If You've Already Arrived
Most connection problems aren't caused by a faulty eSIM. Based on our customer support experience, they're usually caused by one or more activation settings that haven't been completed correctly.
Common causes include:
- Mobile Data hasn't been switched to the eSIM.
- Data Roaming is turned off.
- APN settings are incorrect.
- VPN is interfering with the connection.
- Airplane Mode is still enabled.
- Your phone hasn't registered with the local network yet.
Key takeaway: Most connection issues are caused by missed activation steps, not faulty eSIMs. Follow the steps below to resolve them.
Get Connected in 6 Simple Steps
Most connection issues can be resolved by completing the activation steps below. We recommend following them in order. After each step, wait 30–60 seconds to see whether your eSIM connects before moving on to the next one.
Before You Begin
Before starting the activation process, please make sure:
- Turn off Airplane Mode.
- Turn off any VPN on your phone.
- Temporarily turn off other SIM cards.
These steps help ensure your phone connects to your travel eSIM instead of another network during activation.
Step 1: Choose Your eSIM as Mobile Data
Go to Settings → Cellular (or Mobile Service) → Mobile Data, then select your newly installed eSIM as the Mobile Data line.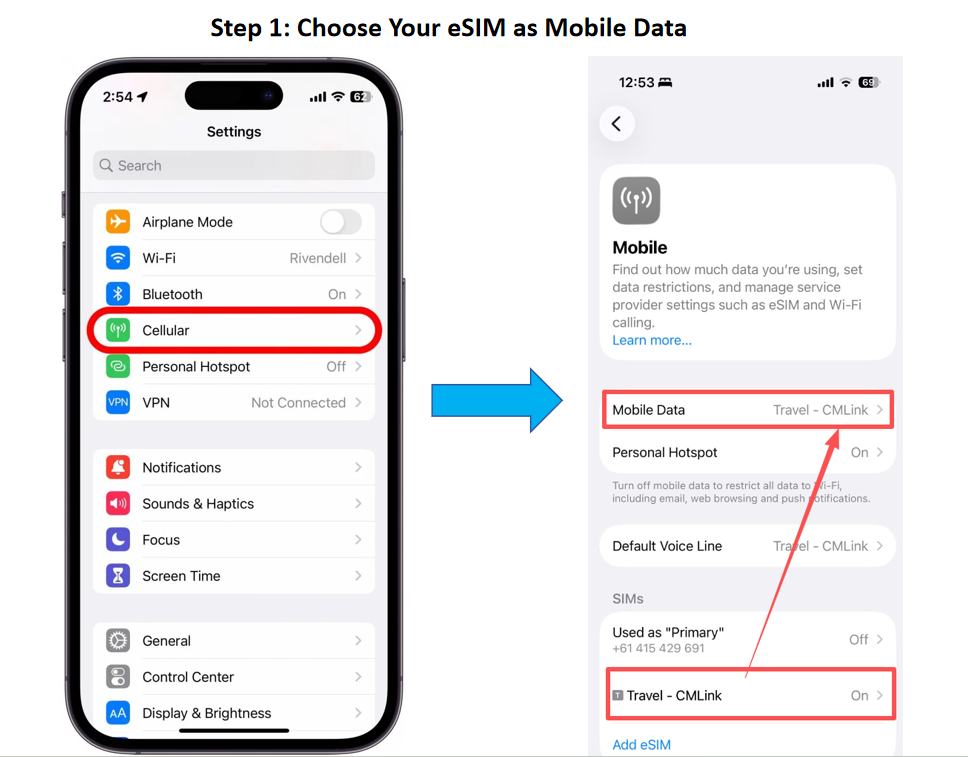
👉Expected result: Wait about 30 seconds to see whether your phone connects before moving on to the next step.
Step 2: Turn On Data Roaming
Tap your travel eSIM and enable Data Roaming.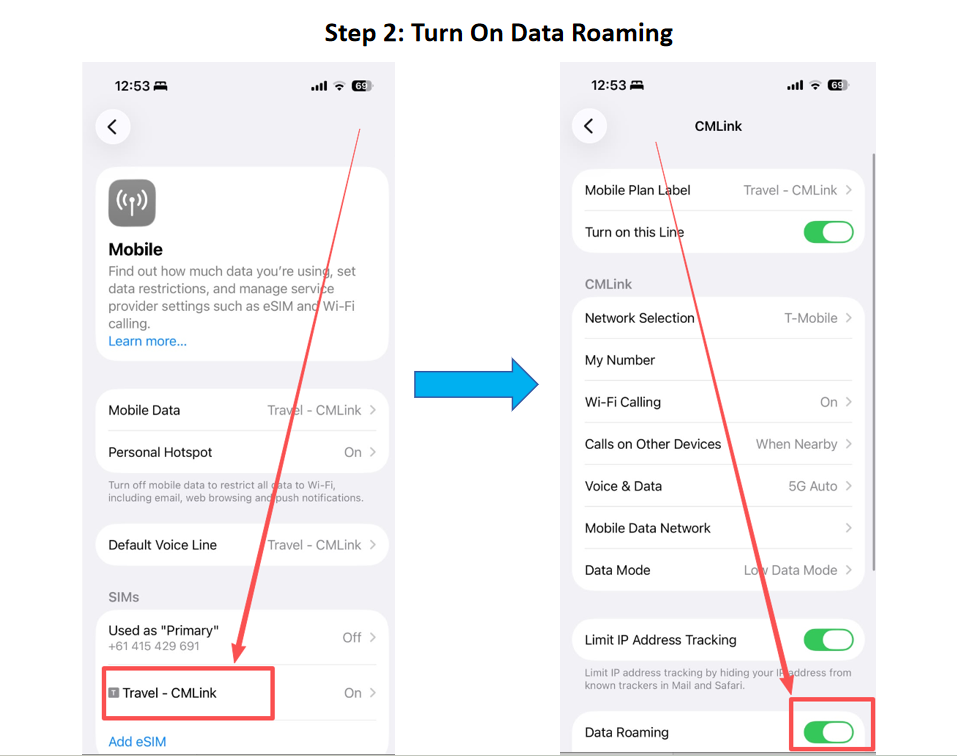
(For most travel eSIMs, Data Roaming must be turned on to connect to the local network.)
👉Expected result: Wait 30–60 seconds to see whether your phone connects to the local network. If you're still offline, continue to Step 3.
Step 3: Switch Voice & Data to LTE / 4G and Set Data Mode to Standard
Once mobile data is working, you can switch Voice & Data back to 5G if your eSIM plan supports it.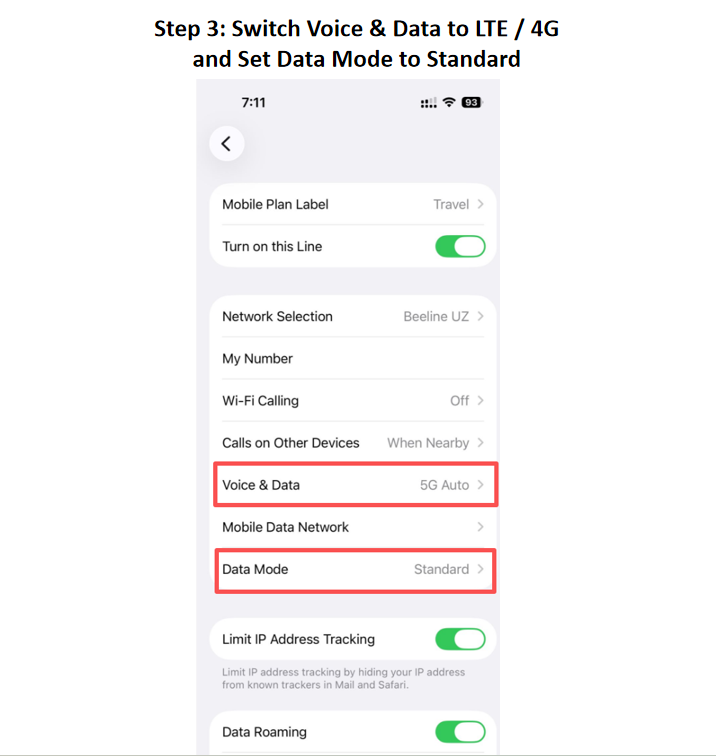
(Some networks may take a short time to register after changing the preferred network mode.)
👉Expected result:
If mobile data starts working, your eSIM is now connected and ready to use. You don't need to continue with the remaining steps. If there's still no connection, continue to Step 4.
Step 4: Check Your APN Settings
Some travel eSIMs require a specific APN configuration. Compare your APN settings with the activation instructions included in your QR code email.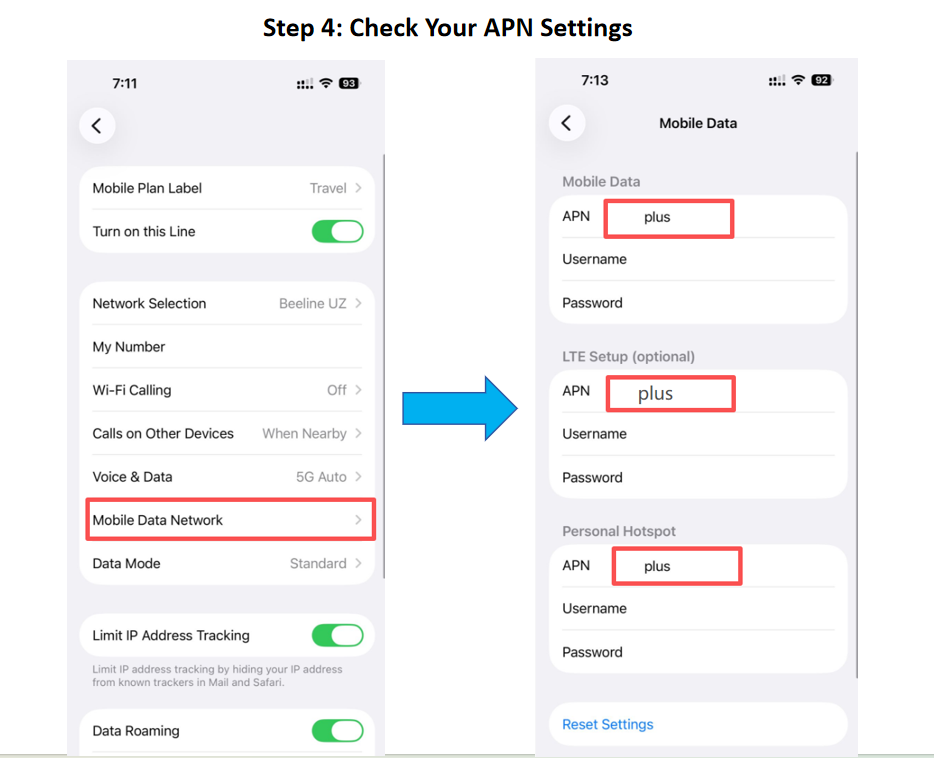
(Important: Unless your product page specifically instructs otherwise, leave the Username and Password fields blank. Only the APN field needs to be entered or updated.)
💡Need help finding your APN settings? → Read our APN Setup Guide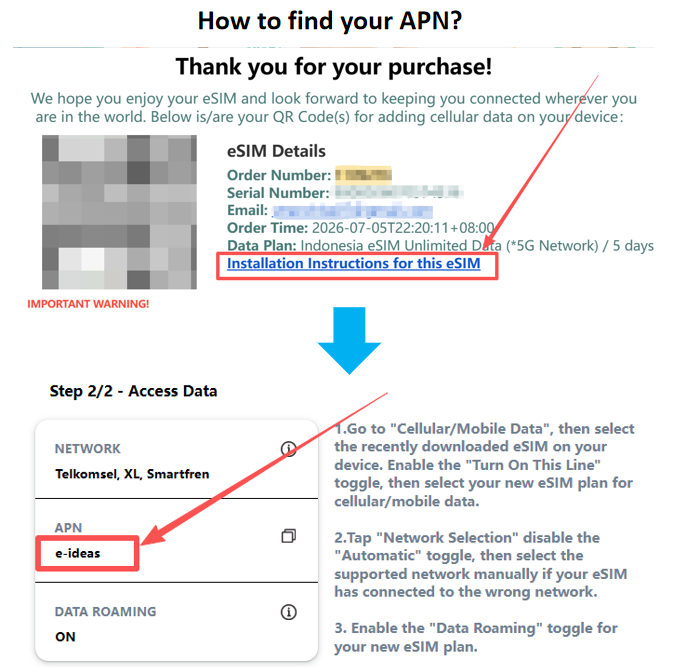
👉Expected result: Save the settings (if required) and restart the phone and wait another 30–60 seconds. If there's still no connection, continue to Step 5.
Step 5: Select the Network Manually
Go to Settings → Cellular (or Mobile Service) → Network Selection. Turn "Automatic" off, then try selecting each available network operator one by one until your phone successfully connects.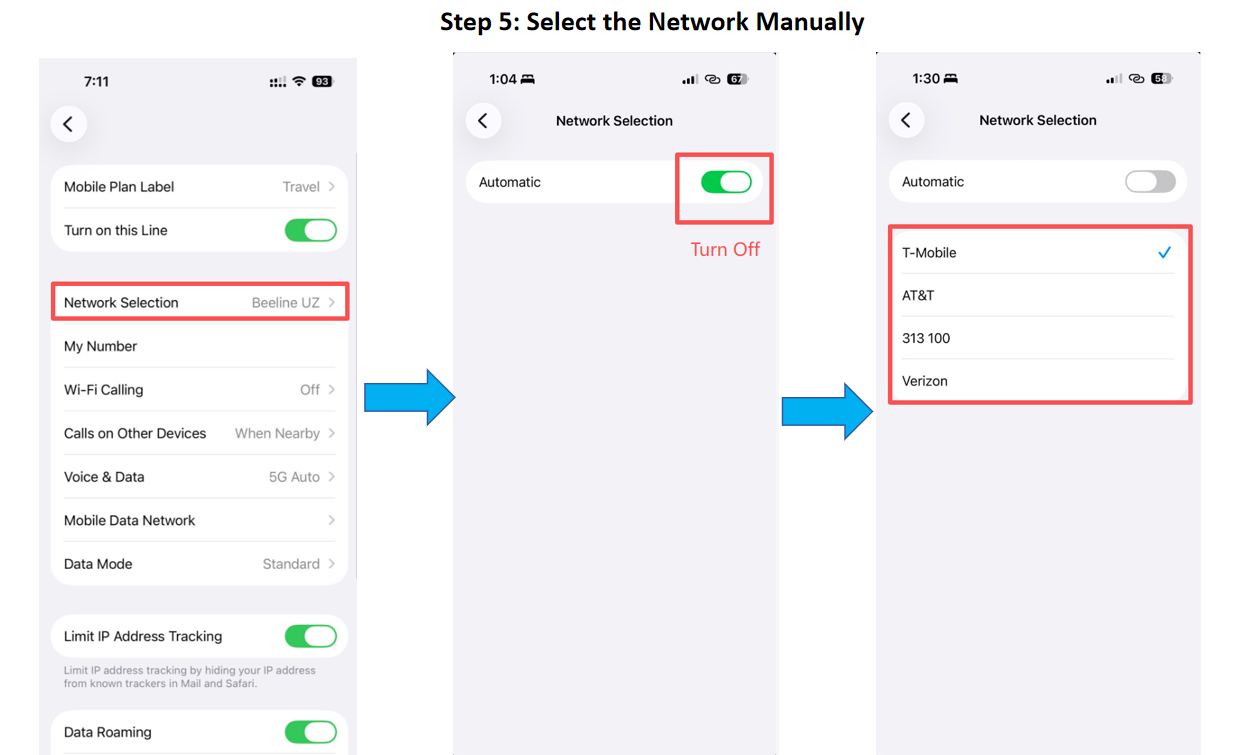
(Some travel eSIMs work with multiple local carriers, while others only support specific partner networks. If one network doesn't work, wait a few seconds before trying the next available carrier.)
👉Expected result: If one carrier connects successfully, you can stop here. If none of the available networks work, continue to Step 6.
Step 6: Restart Your Phone and Try Again
Restart your phone. Once it turns back on, wait about one minute before repeating Step 5.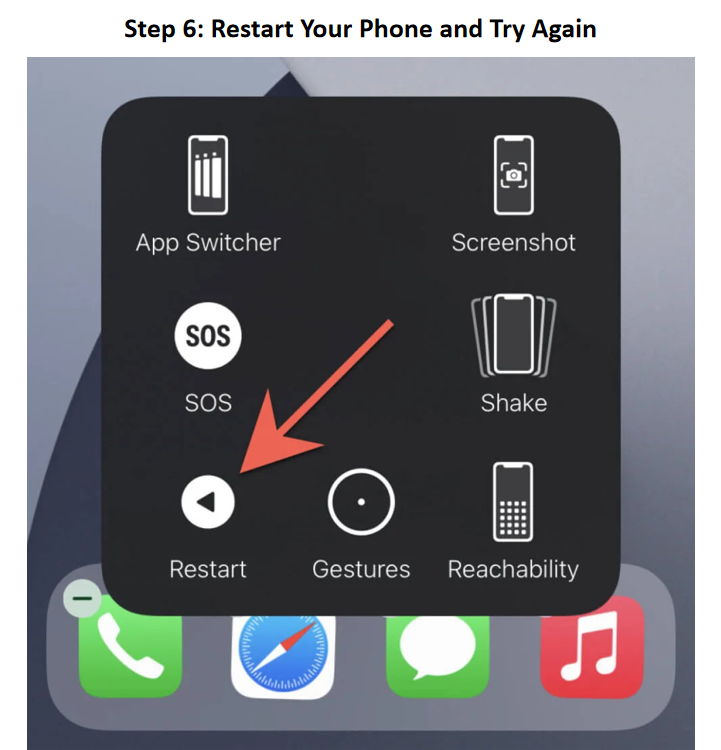
(Restarting refreshes your phone's network registration and often resolves temporary connection issues.
If your eSIM still isn't working after completing all 6 steps, continue to the next section for further assistance.)
Pro Tip: After each step, wait 30–60 seconds before moving to the next one. Network registration can take a moment, especially after landing in a new country.
What You Should Know About Special eSIM Requirements
Not all travel eSIMs follow the same activation process. Depending on the product and carrier, some eSIMs may have additional requirements that differ from the standard setup steps. Below are a few special activation scenarios you may encounter:
1. Confirmation Code (G Code) Required
Some eSIMs require an additional Confirmation Code (G code) during installation, in addition to scanning the QR code. This code can be found in your order email or activation instructions and must be entered correctly to complete the installation.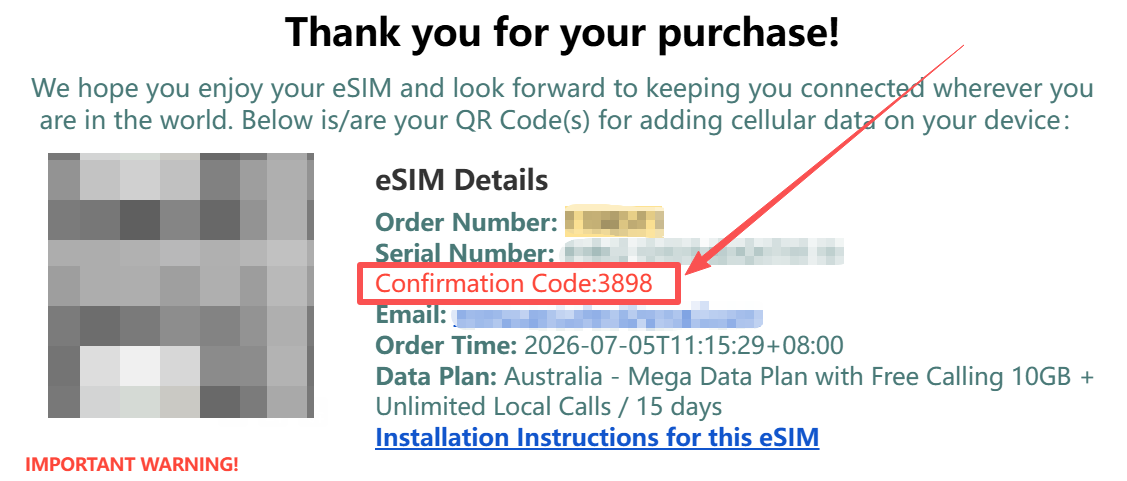
2. Delayed Activation (Up to 48 Hours)
Some eSIMs do not activate immediately after installation. Instead, activation may take up to 24–48 hours, depending on the carrier system. During this time, your eSIM may remain in an "Activating" status. This is normal and does not require reinstalling or rescanning the QR code.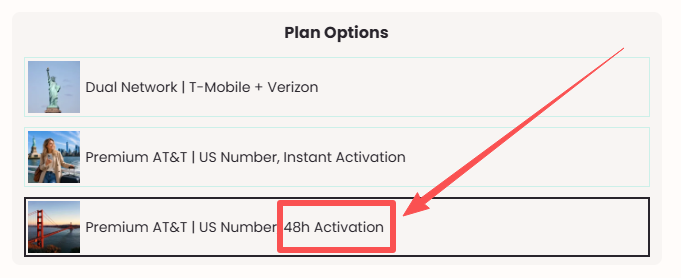
3. Activation Requires Dialing a Special Code After Arrival
Some travel eSIMs require an additional activation step after you arrive at your destination. Instead of activating automatically, you'll need to dial a specific code to complete the activation process.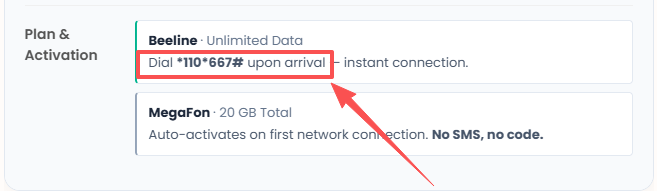
Key takeaway: Always read your product page and activation instructions carefully. Some eSIMs have special requirements that differ from the standard setup process.
Still Can't Get Connected?
If you've completed all 6 steps above and your eSIM still isn't connecting, don't worry. Our customer support team is available 24/7 and will be happy to help you troubleshoot the issue.
Contact us:
- WhatsApp: +852 9290 0577 / +852 9243 7776
- Email: service@bytesim.com
To help us identify the problem as quickly as possible, please prepare the following information before contacting us.
1. Your Order Number, Serial Number, or the Email Address Used for Your Purchase
This allows us to quickly locate your order and verify your eSIM information. (Insert example screenshot here.)
2. A Screenshot of Your SIM List
This helps us confirm that the eSIM has been installed successfully and identify all SIM profiles currently on your device.
3. A Screenshot of Your eSIM Settings
Please include the page showing your eSIM settings, especially Mobile Data selection, Data Roaming, and Voice & Data (Network Mode). This helps us verify whether the activation settings have been configured correctly.
4. A Screenshot of Your APN Settings
If your eSIM requires a custom APN, we'll compare your settings with the correct configuration.
5. A Screenshot of the Network Selection Page
Please show the list of available network operators and indicate which carrier you selected (if applicable). This helps us determine whether your phone is detecting supported local networks.
6. A Screenshot of Your VPN Settings (If Applicable)
If you're using a VPN, please include a screenshot of your VPN settings. Some VPN services may interfere with the activation process or prevent your phone from connecting to the local mobile network.
Note: Please don't worry if you're unsure which screenshots to provide. Simply send us what you can, and our support team will guide you through the rest.
Tips to Avoid Activation Problems
Before your next trip, take a minute to review these simple tips. They can help you avoid the most common activation issues and get connected faster when you arrive.
- Install Your eSIM Before You Travel
Avoid using airport Wi-Fi, mobile data, or personal hotspots when installing your eSIM. A stable home or hotel Wi-Fi connection ensures the installation process is not interrupted. - Give Your eSIM a Recognizable Name
Rename your eSIM (e.g., "Japan eSIM" or "Europe Travel") so you can easily identify it later in your SIM settings. - Select your eSIM as the Mobile Data line
Before using mobile data, double-check that your travel eSIM is selected as the primary data SIM. - Always enable Data Roaming when using travel eSIMs
Data Roaming is required for most travel eSIMs to connect to local networks. Make sure it is turned on after arrival. - Turn off VPN before connecting
VPN services may interfere with initial network registration. - Keep your QR code email safe
Your QR code email contains important installation and APN information. Do not delete it during your trip. - Follow product-specific instructions carefully
Some eSIMs may have special requirements such as APN settings, activation delays, or scan limits. Always check your product page before installation.
Final takeaway: Most travel eSIM connection issues can be resolved by following the activation steps in this guide. If you're still unable to connect after completing all the recommended checks, our support team is available 24/7 and will be happy to help.
© 2026 eSIM Activation Guide — Stay connected wherever you travel.