The Ultimate Guide: How to Scan an eSIM QR Code on iPhone
Jun 12,2026 | Wang
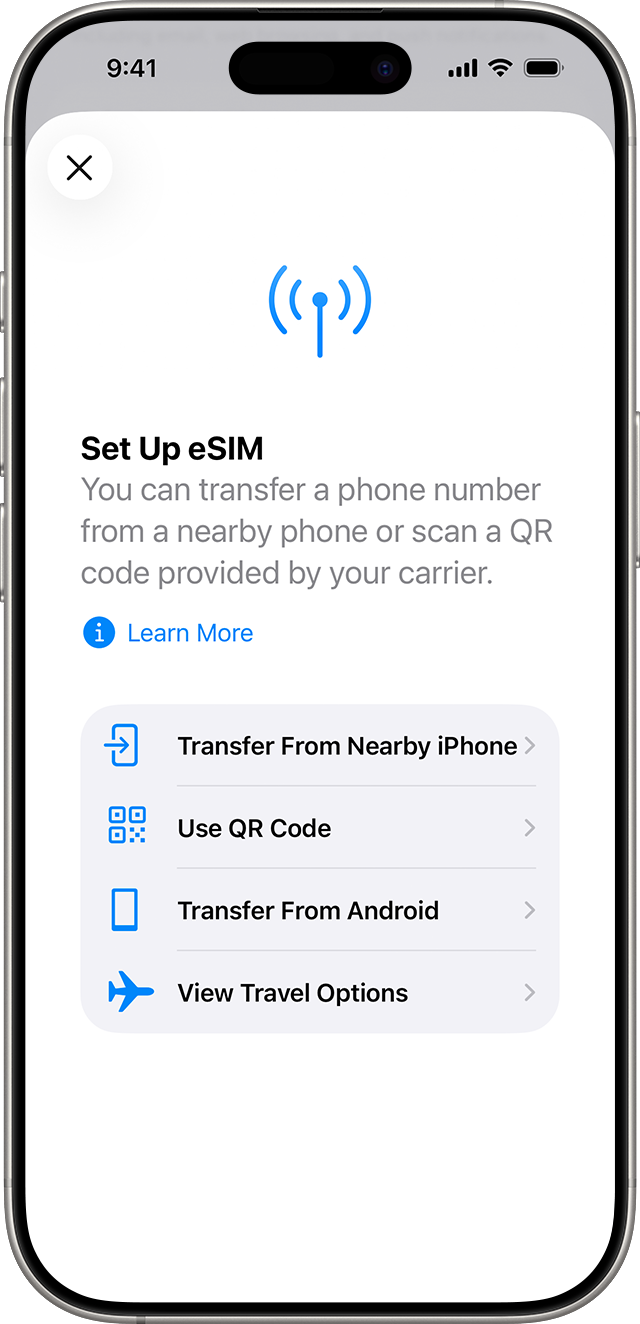
To scan an eSIM QR code on your iPhone, first make sure you are connected to a strong Wi-Fi network. Then, go to Settings > Cellular (or Mobile Data) > Add eSIM, and tap Use QR Code.
Traveling can be stressful enough. You buy an eSIM to save money on internet abroad. A QR code wil be sent to your inbox.
But when you arrive at the airport, you face a huge problem: you only have one phone. You cannot use your camera to scan a code that is on your own screen.
This simple problem makes many travelers panic. They end up buying expensive local SIM cards at the airport instead. The truth is, traditional setup guides often assume you have a laptop open or a printed piece of paper.
Thankfully, modern iPhones have fixed this problem. Apple has built clever, simple features that let you set up your plan even if you only have one screen.
Before we start, let's make sure your phone is ready. Most Apple phones from the iPhone XR onward support this feature. If you want to double-check your specific model, you can review our complete eSIM compatible devices list to be absolutely sure.
What Is an eSIM QR Code?
Before we scan anything, it helps to know what we are actually doing.
A normal QR code (like a restaurant menu) simply opens a website link. An eSIM QR code is completely different. It is a secure digital key.
When your iPhone scans this special code, it connects to a mobile carrier's server. It then downloads a small file into your phone's memory. This file tells your phone how to connect to the local cell towers in your destination country.
Because it downloads a file, the setup process needs a little more care than just scanning a menu at a cafe.
Crucial Preparation Before You Scan
Many travelers skip the prep work. This is the biggest reason why eSIM setups fail. Please check these two things before you open your camera.
1. Find a Good Wi-Fi Connection
You must connect to a stable and strong Wi-Fi network.
As we just mentioned, your phone needs to download a file. If the internet drops during this download, the setup will fail.
Try to avoid public airport Wi-Fi if possible. Airport networks often have hidden login pages. They might show full Wi-Fi bars, but they block downloads until you click "Accept" on a hidden web page.
It is much safer to set up your plan at home before you leave for the airport.
2. Check for Carrier Locks
Ensure your iPhone is not locked to your home network.
If you bought your phone through a specific carrier like AT&T or T-Mobile on a payment plan, it might be locked. A locked phone cannot accept new network profiles.
You can read the official Apple guidelines on carrier unlocking for more details.
To check your phone right now, go to Settings > General > About. Scroll down until you see "Carrier Lock." If it says "No SIM restrictions," your phone is unlocked and ready to go.
Summary: 3 eSIM Activation Methods Compared
There is more than one way to get online. Here is a quick look at the three methods we will cover. Choose the one that fits your current situation:
| Situation | Method | Difficulty | Time Needed | What You Need |
|---|---|---|---|---|
| Have a laptop or printed paper | Method 1: Standard Scan | ⭐ | ⏱ 1 Min | A second screen or printout |
| Only have one phone | Method 2: Scan from Photos | ⭐⭐ | ⏱ 2 Mins | iOS 16+, screenshot saved |
| Camera is broken or won't read | Method 3: Manual Entry | ⭐⭐⭐ | ⏱ 3 Mins | Copy and paste codes |
Method 1: The Standard Way (With Two Devices)
If you have a computer tablet nearby, or if you printed your travel documents, this is the easiest method.
The Standard Settings Route:
- Connect your iPhone to Wi-Fi.
- Open your iPhone's Settings app.
- Tap on Cellular or Mobile Data.
- Scroll down and tap the blue Add eSIM button.
- Tap Use QR Code.
- Your camera will now open. Point your lens at the code on your laptop or paper.
- Your phone will read it instantly and guide you through the setup.
The Fast Camera Shortcut:
If your iPhone is fully updated, there is an even faster way. You do not even need to open the Settings app.
Simply open your normal Camera app, just like you are taking a holiday photo. Point the camera at the eSIM QR code.
A small yellow bubble that says "Cellular Plan" will appear on your screen. Tap that yellow bubble. Your phone will instantly take you to the correct setup page.
Method 2: How to Scan on the Same iPhone (From Photos)
This is the solution most travelers need. Your QR code is in your email, and you only have one phone. Here is how to make your iPhone read its own screen.
Step 1: Take a Screenshot
Open the email or PDF that has your QR code. Make sure the code is big and clear on your screen.
Take a screenshot. To do this, press the Power button and the Volume Up button at the exact same time. The image will save to your Photos app.
Step 2: Go to the Scanner
Just like Method 1, go to Settings > Cellular > Add eSIM > Use QR Code. Your camera will turn on.
Step 3: Open Your Photo Gallery
Do not worry about the blank camera screen. Look closely at the bottom of your screen. You will see a small button that says Open Photos.
Step 4: Select the Image
Tap that button. Your photo gallery will open. Find the screenshot you just took and tap it.
Your iPhone is very smart. It will scan the picture, find the code, and start the setup automatically.
If you are worried about keeping your normal phone number active for text messages while traveling, our in-depth guide to using Dual SIM on iPhone explains how to manage two numbers easily.
Method 3: Enter Details Manually (The Failsafe)
Sometimes things go wrong. Your camera lens might be dirty. The QR code might be too blurry to scan. Or maybe your older iPhone does not have the "Open Photos" button.
Do not worry. You can always type the code in by hand.
When you buy an eSIM, an email will be sent to you. Look below the installation instructions link. You will always find two strings of text. One is called the SM-DP+ Address. The other is the Activation Code.
- Go back to the camera screen (Settings > Cellular > Add eSIM > Use QR Code).
- Look at the very bottom of the screen. Tap the button that says Enter Details Manually.
- A new screen with two blank boxes will appear.
- Go to your email. Copy the SM-DP+ Address. It usually looks like a website address (for example, rsp.truphone.com). Paste it into the first box.
- Copy the Activation Code. This is usually a long mix of capital letters and numbers. Paste it into the second box.
- Tap Next in the top corner. Your phone will connect to the server and download your plan.
Crucial Post-Activation Settings (Avoid Roaming Fees)
Once the setup bar finishes loading, your eSIM is installed. But you are not done yet.
You must change a few quick settings. If you skip this part, your phone might use your home network by mistake, resulting in a massive roaming bill.
Label Your Plans
Your iPhone will ask you to name your phone plans. It is best to name your original home SIM as "Primary." Name your new travel plan "Travel." This keeps things clear.
Choose Your Data Line
Next, the phone will ask which line to use for internet. Make sure you select your new "Travel" line for Cellular Data.
There is a switch on this screen called "Allow Cellular Data Switching." Turn this OFF. If you leave it on, your phone might secretly switch back to your expensive home network when the travel signal gets weak.
Turn on Data Roaming
Finally, when your plane lands at your destination, you need to turn the airplane mode off.
Go to Settings > Cellular. Tap on your "Travel" line. Look for the switch called Data Roaming and turn it ON.
Your travel eSIM needs Data Roaming turned on so it can connect to local partner cell towers abroad. If you want to learn exactly why this works, read our simple guide on how to properly set up and activate iPhone.
eSIM Won't Scan? 5 Common Errors Fixed
Even with perfect instructions, errors happen. Here are the five most common problems and exactly how to fix them.
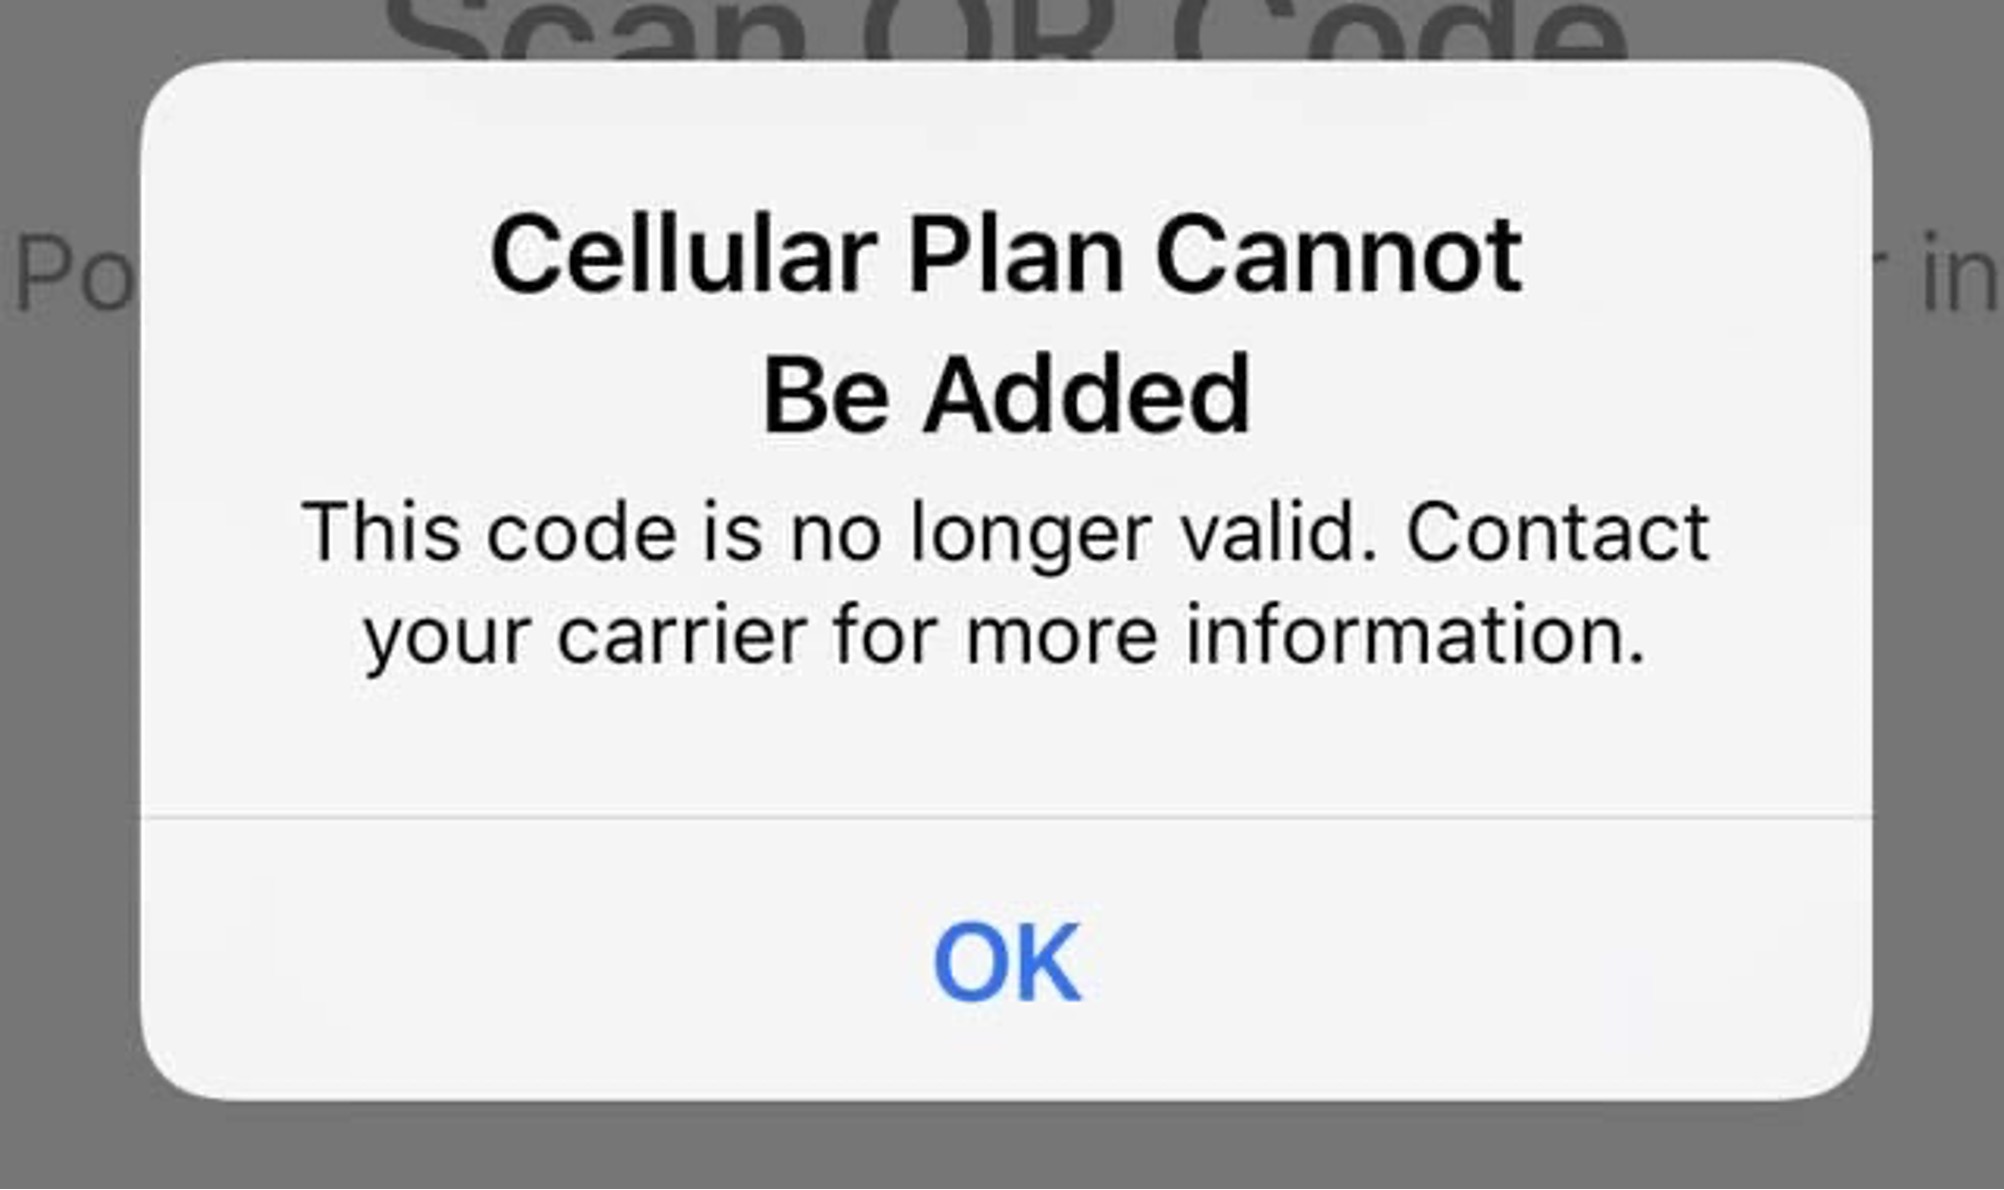
1. "Cellular Plan Cannot Be Added"
This error is frustrating. It almost always means your phone has a carrier lock.
As we mentioned earlier, you must call your home phone company (like AT&T or Verizon) and ask them to unlock your device. This is a rule built into the phone. The eSIM provider cannot fix this for you.
You can read the GSMA specifications on eSIM technology to learn why the industry requires these security locks.
2. "Code No Longer Valid"
eSIM QR codes can only be used one time. Once you scan it and download the plan, the code is dead.
Sometimes, travelers scan the code, get confused, and delete the plan from their settings. When they try to scan the code a second time, they see this error.
Never delete a travel plan from your settings unless customer support tells you to. If you did delete it, you must contact your provider to ask for a new code.
If you are certain that you have not deleted your eSIM, the troubleshooting guide also includes detailed steps for a quick self-check to resolve this issue.
3. Stuck on "Activating..." for a Long Time
This is almost always a Wi-Fi problem.
Your phone is trying to download the file, but the internet is too weak or blocked. This happens often at hotels and airports.
Turn off your Wi-Fi and turn it back on. Try to connect to a different network. If you are traveling with a friend, ask them to turn on their personal hotspot for two minutes so you can finish the download.
4. Setup is Done, but You Have "No Service"
First, check your location. Travel data plans usually will not show any signal until you actually arrive in the destination country.
If you have already landed, check your settings again. Make sure the travel line is turned "On" and that "Data Roaming" is switched "On."
Manually switch your network to the operators marked in the product description.
And restart your phone may also help.
5. The Camera Won't Focus on the Code
If you are using Method 1 (scanning from another screen), your camera might blur.
This happens when the other screen is too dark. Turn the brightness all the way up on the laptop or phone showing the code. Zoom in on the square just a little bit.
Make sure there are no bright lights reflecting off the screen into your camera lens.
Conclusion & Next Steps
Getting your phone ready for a trip should not be a headache.
Now that you know how to scan from your photo gallery, use the camera shortcut, and type codes manually, you are ready for any situation. You never have to worry about getting lost without Google Maps or losing access to your travel documents again.
Right now, staying connected is more important than ever.
As the world gathers for the massive 2026 FIFA World Cup, millions of fans are traveling across North America.
When you are on the road, your phone is your lifeline. You need reliable internet to download your digital stadium tickets, navigate through huge crowds, and share live videos of a winning goal with your friends back home.
Because this historic tournament is spread across three different countries, managing your phone plan can be tricky.
That is why ByteSIM have created four dedicated World Cup eSIM plans specifically for football fans.
Whether you are catching the opening match in Mexico, exploring the host cities in Canada, heading to the grand final in the USA, or following the games across all 16 cities in North America with our all-in-one plan, we have you covered.
Browse our special 2026 World Cup eSIM collections below, pick your match destination, and enjoy the beautiful game with total peace of mind.


Comment